
I fell in love with the gourd by accident. I wanted some seeds for my garden, you know, those little ones that filled baskets & doorsteps around Halloween. While looking for the seeds, the search brought me to a world of amazing art. I found the Welborn Gourd farm in Fallbrook, California. Their website showcased gourd art truly worthy of gallery display. It just so happened that I was going to be visiting my sister in southern California that year. Low and behold, Welborns were conducting their annual gourd art festival during the time I was to be out there, and come to find out, it was only 15 minutes away from my sister's house. Well, as you can imagine, my craft mind was on steroids when I walked through that festival where I fell in love with the gourd.
Just a few pieces of the art coming from their website. I could only dream to have this kind of talent.


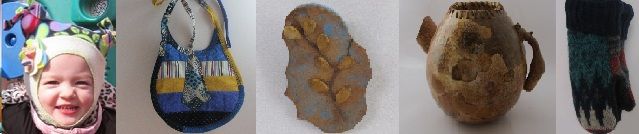
The one on the left is by Carrie Dearing
and
the one on the right is by Pamala Redhawlk
Welborn Gourd Gallery
Well as you can see, the art is fabulous. I really had no expectations of ever doing anything as beautiful as these, but I dabbled. Soon I had purchased a dremel and set out to craft a gourd. I don't even remember what my first project was, but I started small. Although this was not my first project, it is typical of the type of project that got me started.


I wanted to make some more unique designs that kind of fit with my outdoor, natural & primitive nature. I came up with gourd jugs and animal themes. Here are three of my finished projects.


Our school mascot is a tiger, so I made a little box for my school desk to hold paper clips. The basket of the box was woven with clothes line and jute. There is a round gourd shard base. The top section of the box was also woven in the basket weave, and then mounted with the painted tiger gourd shard top. I am not a painter, so I went to clip art and found an easy design to trace. Then it was just a matter of getting the painting right. I looked at a clip art photo and basically just followed the colors in that to try to get it right. For me, I did not worry about how professional it should look. I just wanted to dress up my desk by featuring our mascot.

As I became more confident in my abilities to design, I created this turtle. I had seen one similar to this at the festival so many years before and had a little snippet of a picture that I took while enjoying the Welborn art festival. I thought, "I can do that". So with a little piecing, this turtle was born. There were several gourds used to create him. Tennessee spinner gourds became the head and front feet, and tail. The back feet were designed with some scrap shards I had in my "keep it for a rainy day" bowl. -Yes I collect seeds and pieces of scrap gourd just like I would fabric scraps for quilts.
Dressing up the turtle was fun. A bit of paint, some faux suede fabric scraps, a basket weave circle of color around the top shell, and a few feathers for the head, and he was complete. I love him! (and so does my daughter, who has claimed him for her own once she returns from her mission trip to Haiti.) In the meantime, he sits atop my piano waiting for his permanent home.
I moved on to wood burning and lamp making. My first lamp had a little bit of wood burned embellishment and I think it turned out quite cute.


Finding gifts for the grandkids is always forefront in my mind. Lately, with all the work on the blog, I have dabbled in the gourds in smaller projects. The rattles and pins below are quick and easy. If you have never worked with gourds before, I would suggest starting with a project like this.

Again, I wish the picture was clearer, but I'll post another when I make my next one. This is a simple project. It is just two spinner gourds put together and lashed with pine needles. The seeds are still in the gourds and create a really nice little rattle. I have made a few of these as keepsakes for the babies in our family. I do have to caution, this is the perfect size for little hands, but I would never recommend giving it to a baby to use. A gourd is a bitter, fruit that could be harmful if swallowed. Also, it wouldn't take much for a baby to pull the glued pieces apart and get the seeds into his/her mouth. Instead, this is meant to go in a little case and shelved as a memory.
My latest projects have been in designing embellishments for hats, and hair, and even as buttons and pins.

Are you looking for a place to display some of your items. Whether for sale, or just a link to your site, you may want to be featured in our craft show. Check it out. Join the craft show!
No comments:
Post a Comment